8. Setting Up a Scene With Helper Tools (Step-by-Step)
This section describes a recommended setup flow for a controller-driven scene (single-actor or multi-actor). It is the best path when you need sequencing, movement, or gaze control.
8.1 Recommended setup order
Use this order to avoid debugging too many systems at once:
- Place snippet prefabs in the scene.
- For automated setup navigate to
Snippets > Scene-Auto Setup. This will set up helper-tools/snippet components automatically, for you to customise. - Alternatively, for manual setup: Configure SnippetsActorRegistry.
- Validate playback with SnippetsSimpleController.
- Add movement (SnippetsWalker) if needed.
- Add sequencing (SnippetsFlowController).
- Add gaze (SnippetsGazeDriver + SnippetsGazeFlowController) last. This progression gives you a clean baseline before layering more behavior.
8.2 Place your actor/snippet prefabs in the scene
- Decide how many actors (characters) you will have in the scene and drag in one snippet prefab for each character.
- Position them where they should appear.
- Rename them with easy to remember identifiers (like their names or roles).
- After placing one snippet instance for each actor in the scene, you can use
Snippets > Scene Auto
Setup
to generate the initial runtime setup (Steps will be provided) or you can set up scene manually.
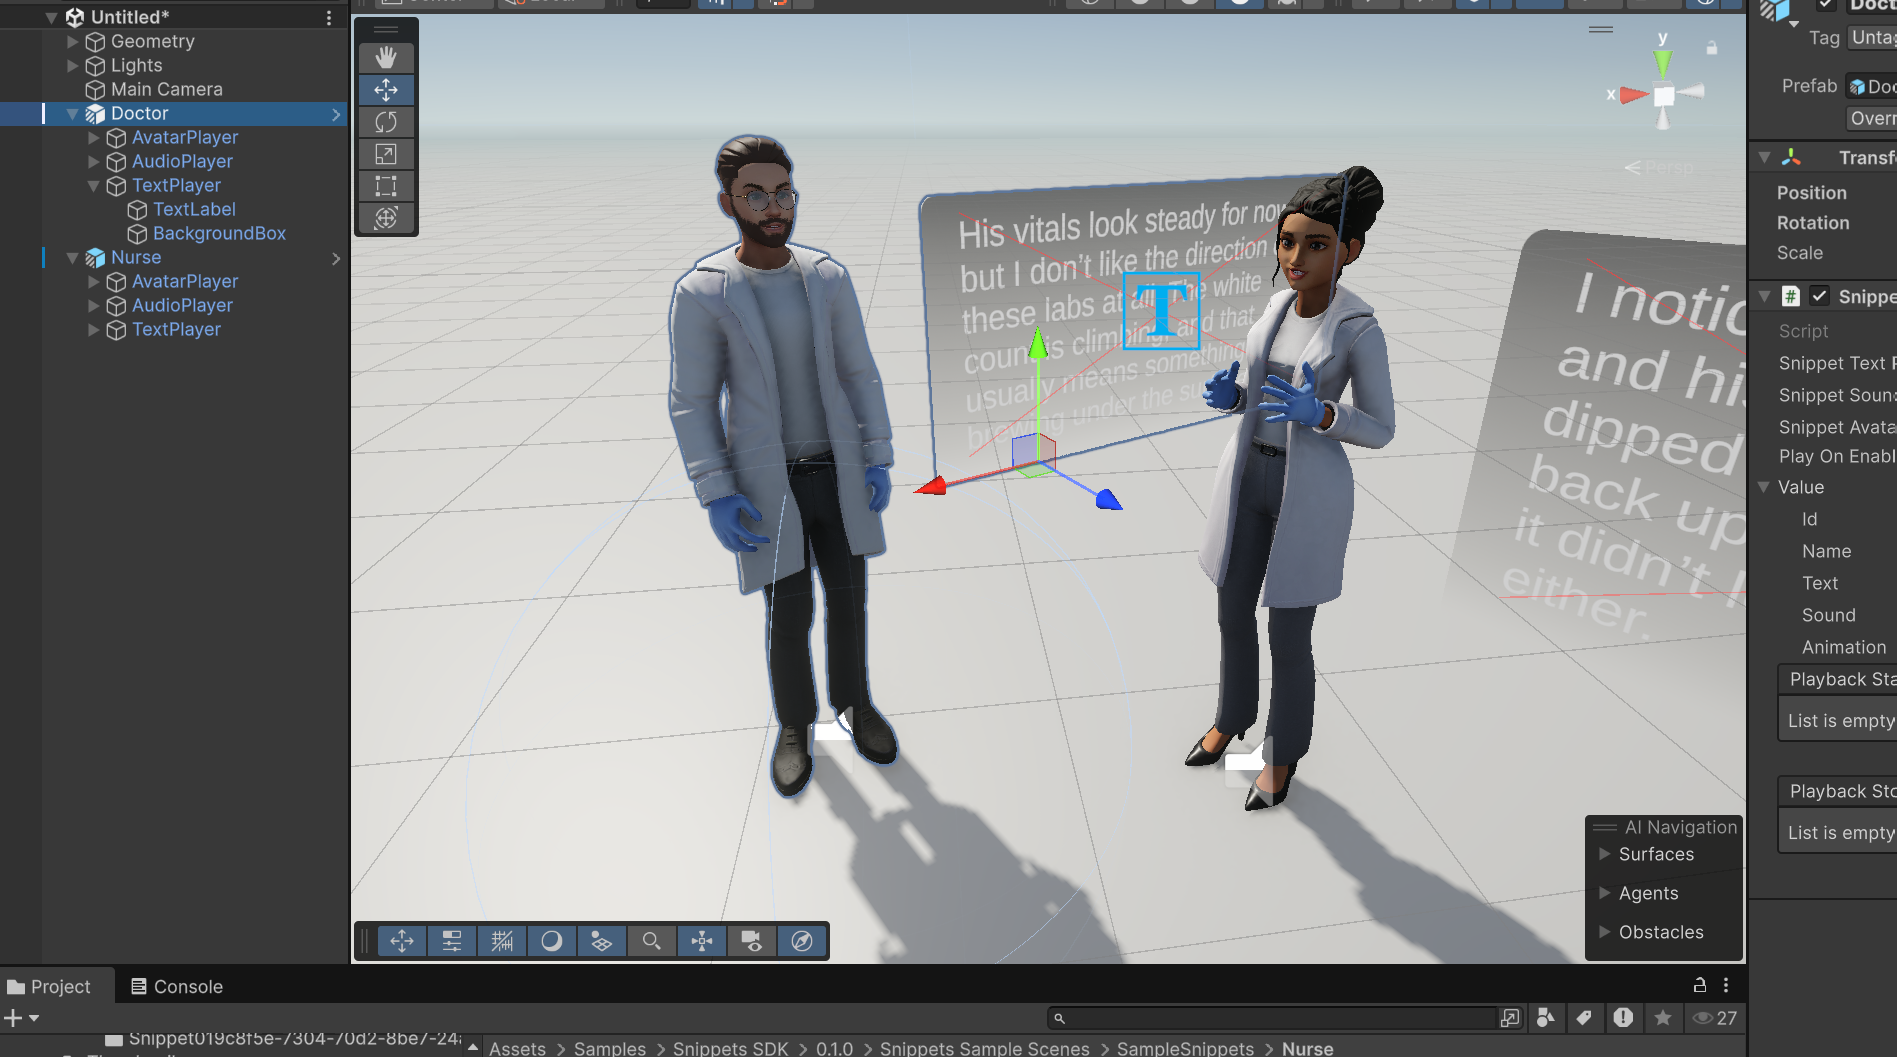
Screenshot to add: Two snippets added to the scene renamed “Doctor” and “Nurse”
8.3 Manual Set-up: Create and configure SnippetsActorRegistry
- Add SnippetsActorRegistry component.
- Add one Actor entry per character.
- For each actor, assign:
- player (SnippetPlayer)
- snippets list (all snippet prefabs you will use for that actor)
- idleClip - find sample idleClip in
SnippetsSDK\Runtime\Assets\Animations\ - walkClip (if movement will be used) - sample walkClip in
SnippetsSDK\Runtime\Assets\Animations\ - walker (optional, if using movement) -> instructions in next points
- gazeDriver (optional, if using gaze) -> instructions in next points
Notes:
- The registry can auto-find some components (like legacy Animation and optionally SnippetsGazeDriver) under the player hierarchy.
- Explicit assignments are still recommended in production scenes for clarity and stability.
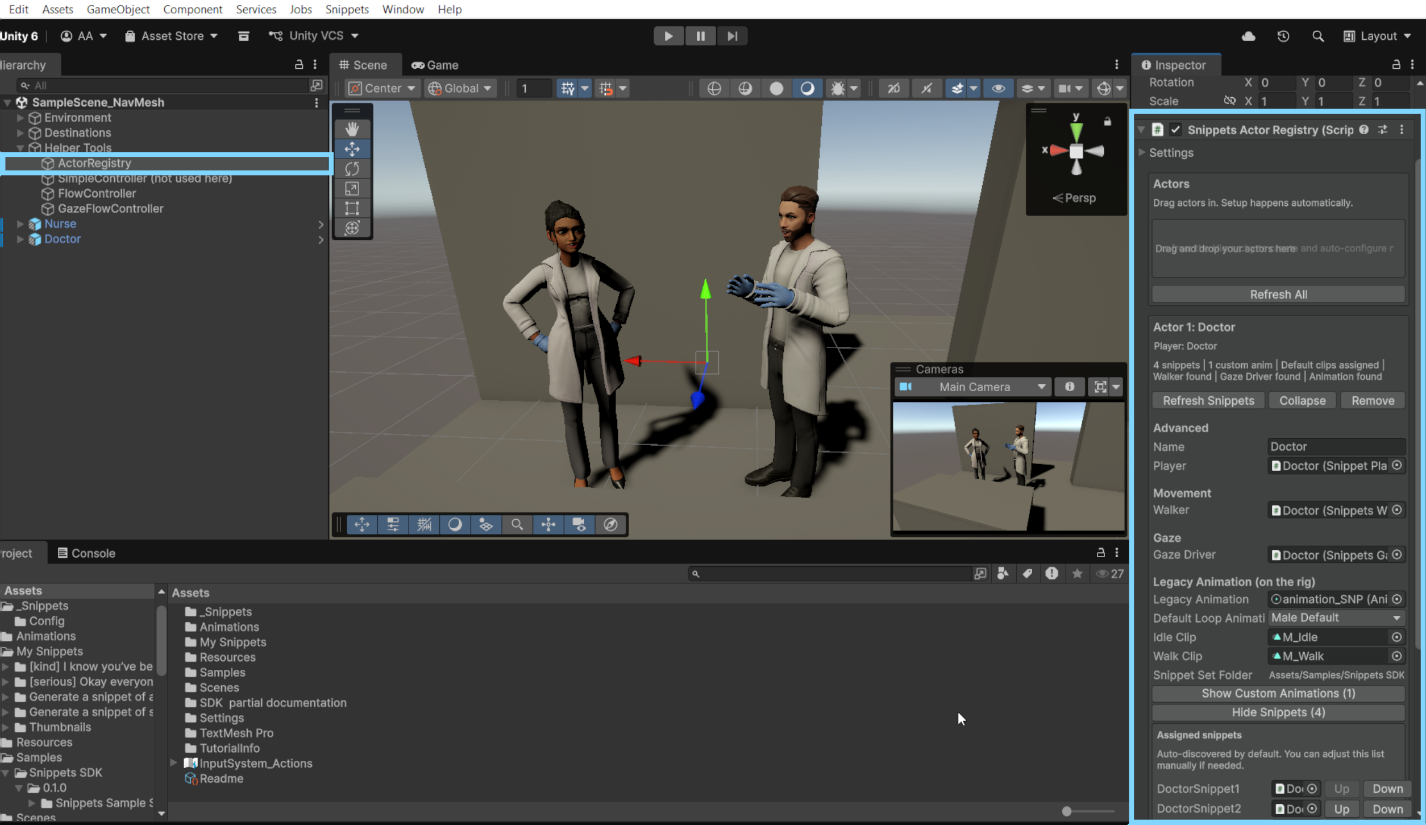

ActorRegistry component with Doctor and Nurse actors attached
8.4 Snippet Scene Auto-Setup
Scene Auto Setup is a fast way to create the basic runtime structure needed for a controller-driven Snippets scene. It
is useful when you want the SDK to automatically add the main helper components, prepare the initial scene wiring,
and give you a starting point that you can customize afterward.
1. Place one Snippet prefab for each actor into the scene (recommended: rename each
snippet actor prefab with their character name).
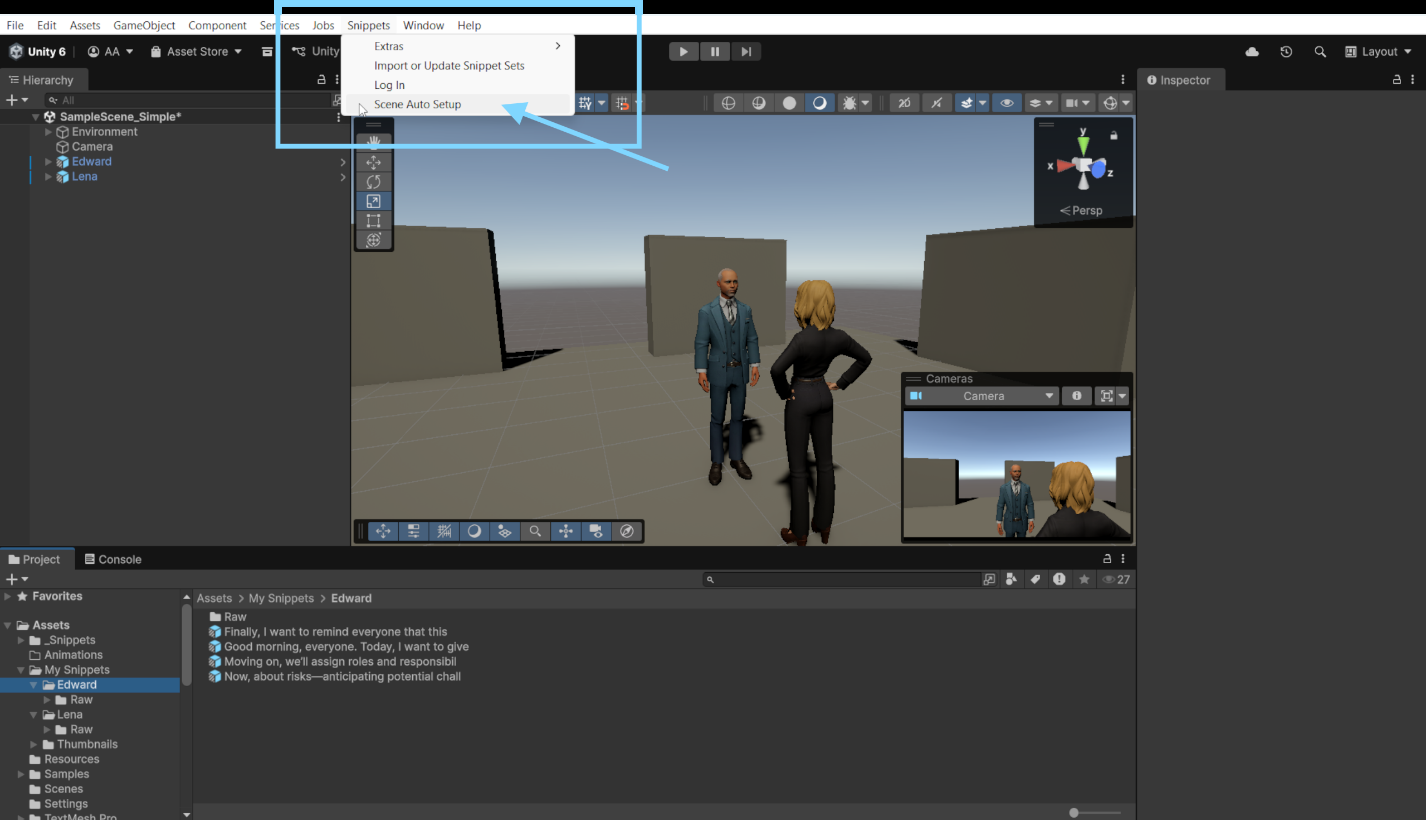
2. In the top menu, go to Snippets > Scene Auto Setup.
- In the Scene Auto Setup window, assign the Snippet instances you want to use in the scene by dragging them in the Actors Object Field.
- Review the options for which helper components should be created.
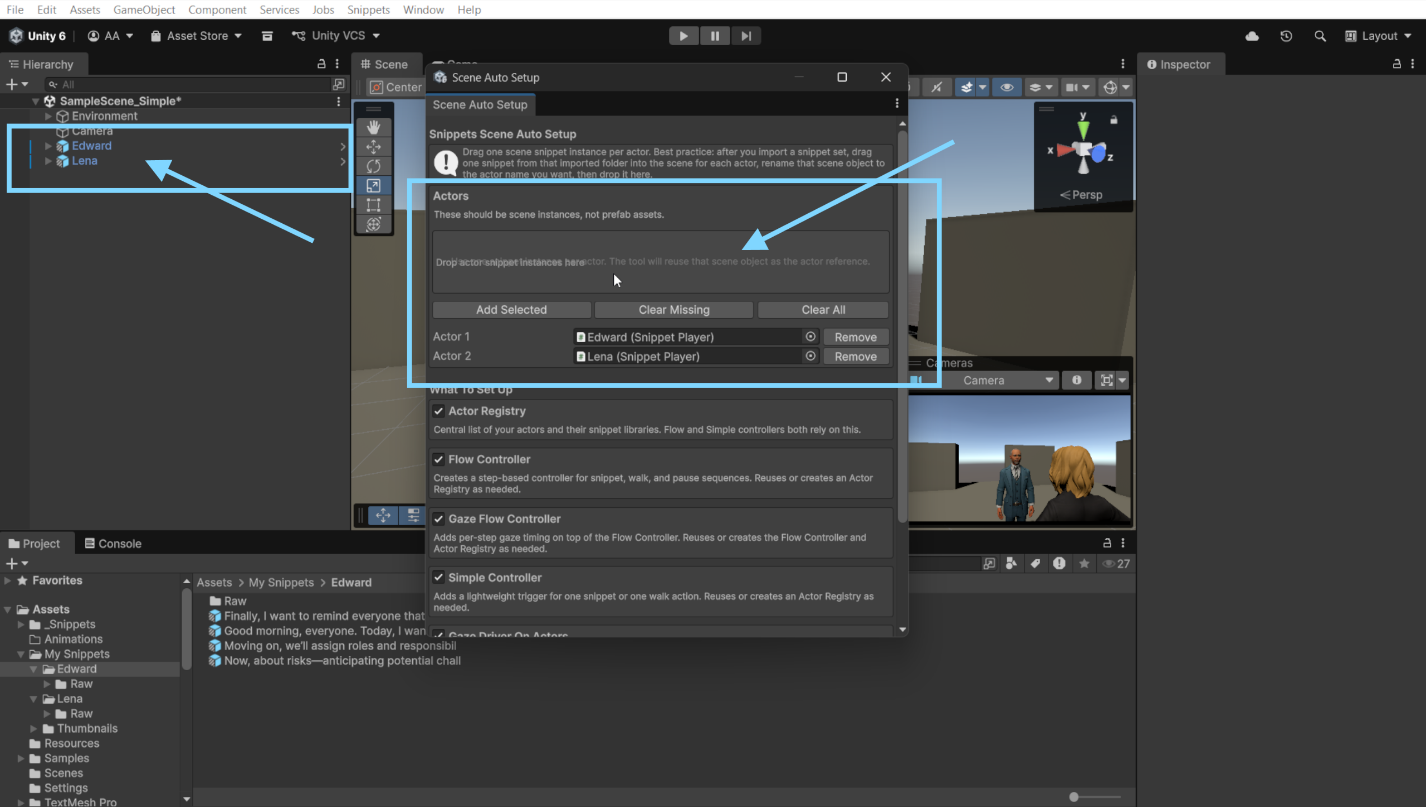
- Click Create or Update Scene Setup.
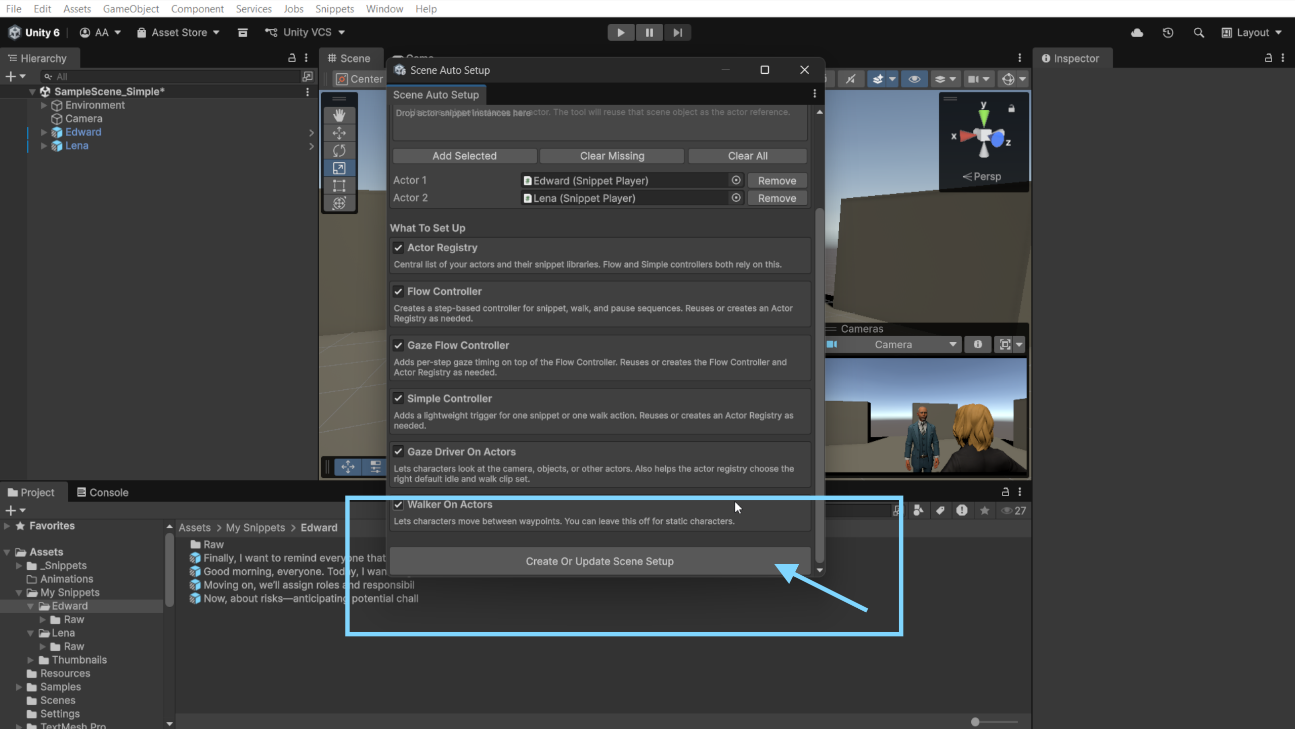
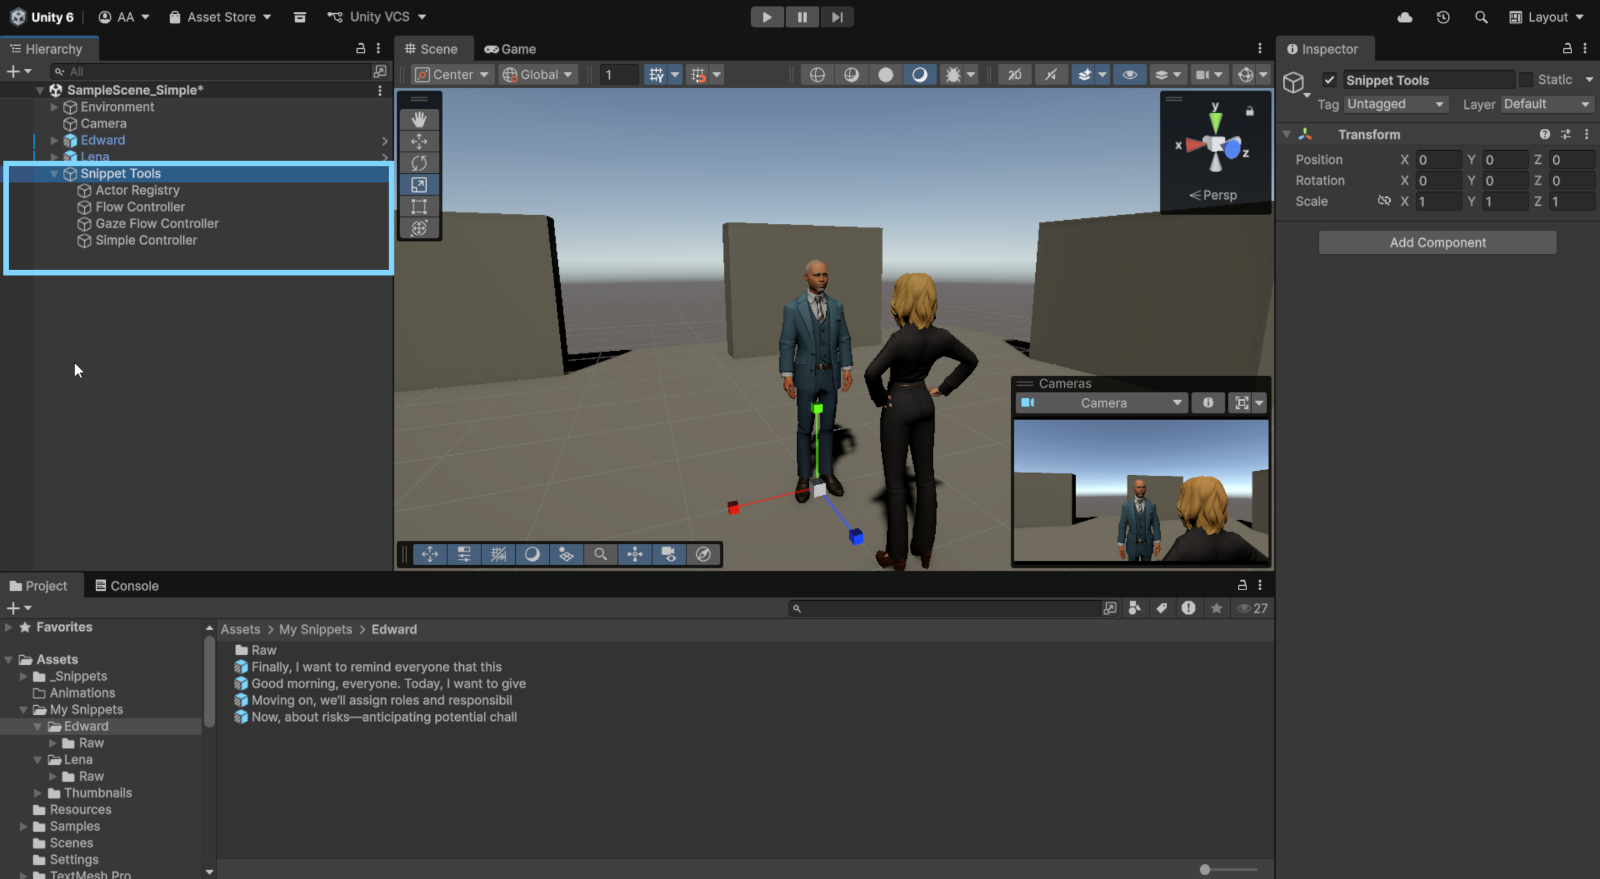
- Result: A parent object named Snippet Tools is created in the scene. By default, it includes: Actor Registry, Flow Controller, Gaze Flow Controller, Simple Controller
- The tool applies an initial configuration so you can start testing immediately and then adjust the setup for your specific use case.
8.5 Validate with SnippetsSimpleController (first runtime test)
Before building a sequence, test the registry setup with a simple trigger. 1. Add SnippetsSimpleController to a GameObject (for clarity make one called SimpleController). 2. Assign the SnippetsActorRegistry. 3. Choose: a. Action = Snippet, Walk, Pause, Custom Animation, or Snippet + Custom Animation b. Actor c. Snippet or Waypoint d. If you use Snippet + Custom Animation, also choose the custom animation, snippet mask if needed, and completion policy. 4. Optionally enable keyboard trigger (default is useful for quick tests). 5. Enter Play Mode and press the configured key or use inspector buttons.
Why this step matters:
- It confirms the registry wiring is correct.
- It isolates setup issues before you build longer flow sequences.
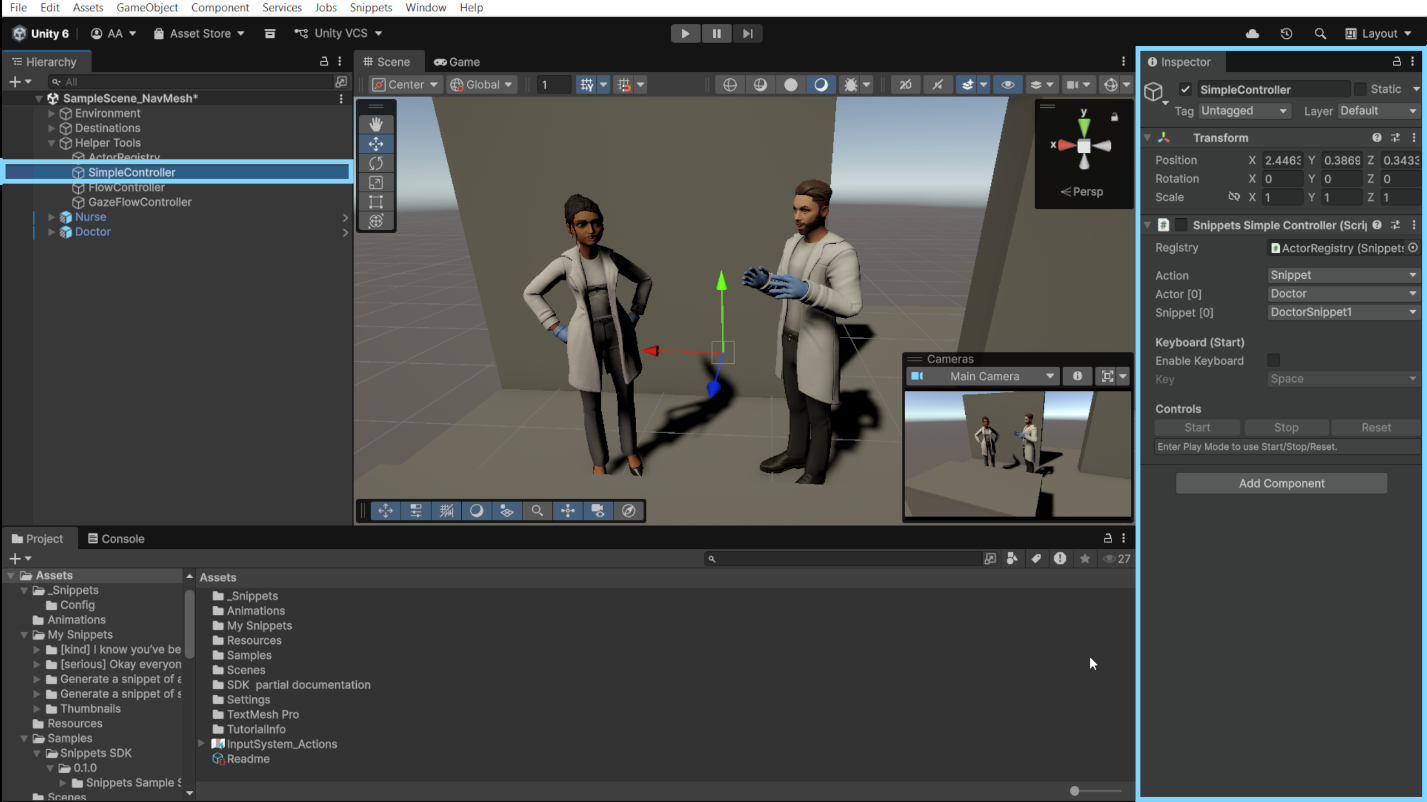
SimpleController testing playing Snippet “DoctorSnippet1” by actor “Doctor”
8.5 Add movement with SnippetsWalker (optional)
If actors need to move between points: 1. Add SnippetsWalker to the actor root (or movement parent object). 2. Create waypoint transforms in the scene. 3. Assign waypoints in order to the walker. 4. Configure movement values: a. moveSpeed b. arriveDistance c. turnSpeed 5. If using NavMesh: a. Enable useNavMesh b. Assign NavMeshAgent c. Tune agent settings
Then:
- Assign this walker to the actor entry in SnippetsActorRegistry.
- Re-test using SnippetsSimpleController with Action = Walk.
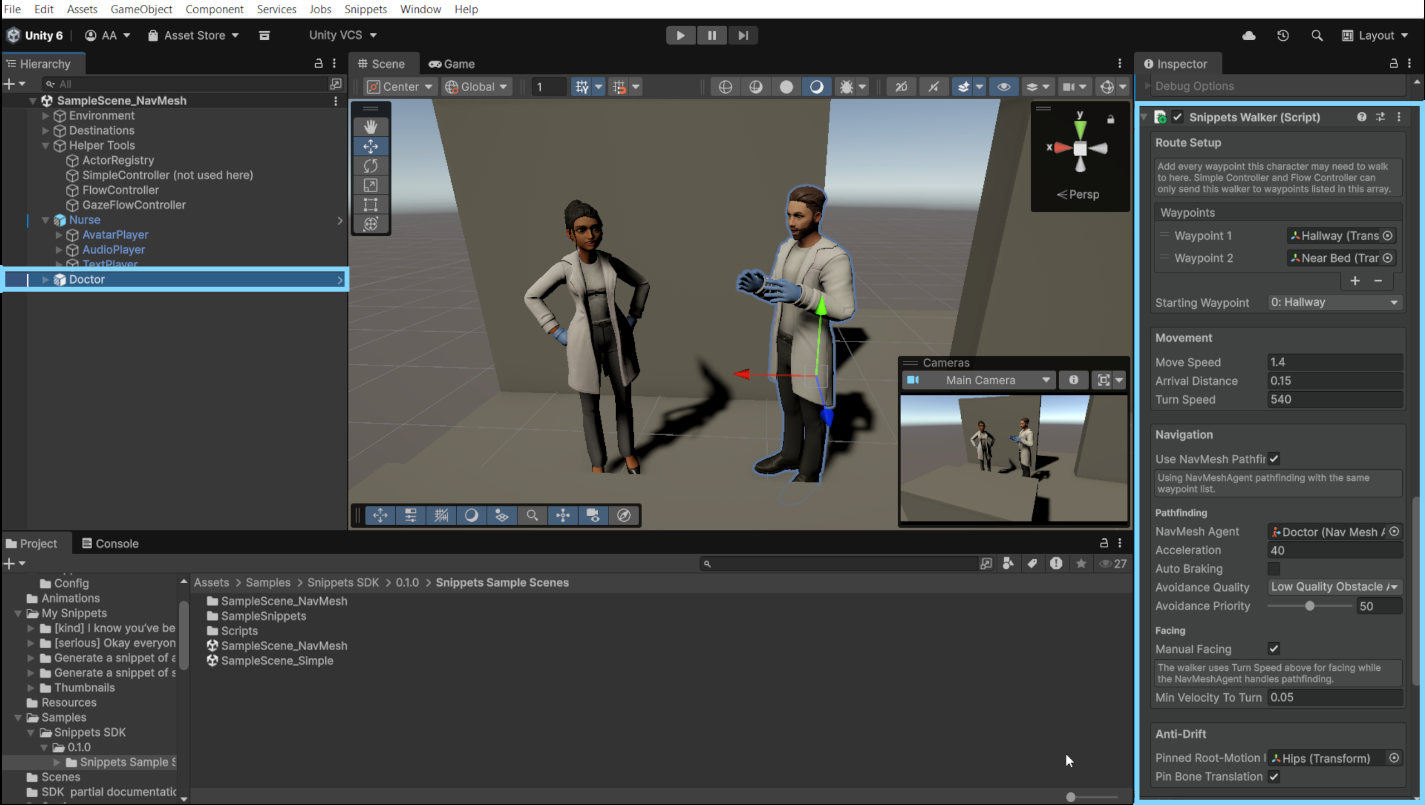
Doctor with the Snippets Walker component attached
8.6 Build a sequence with SnippetsFlowController
Use SnippetsFlowController when you want controlled steps such as “speak, walk, pause, speak.” 1. Add SnippetsFlowController to a new GameObject called “FlowController”. 2. Assign the SnippetsActorRegistry. 3. Configure flow options (Play On Start, Loop Sequence, Auto Progress, Keyboard key): 4. Add steps in the Steps list. 5. For each step choose: a. Snippet: actor + snippet name/index b. Walk: actor + waypoint name/index c. Pause: timed pause or wait-for-trigger d. Custom Animation: actor + custom animation name/index e. Snippet + Custom Animation: actor + snippet + custom animation
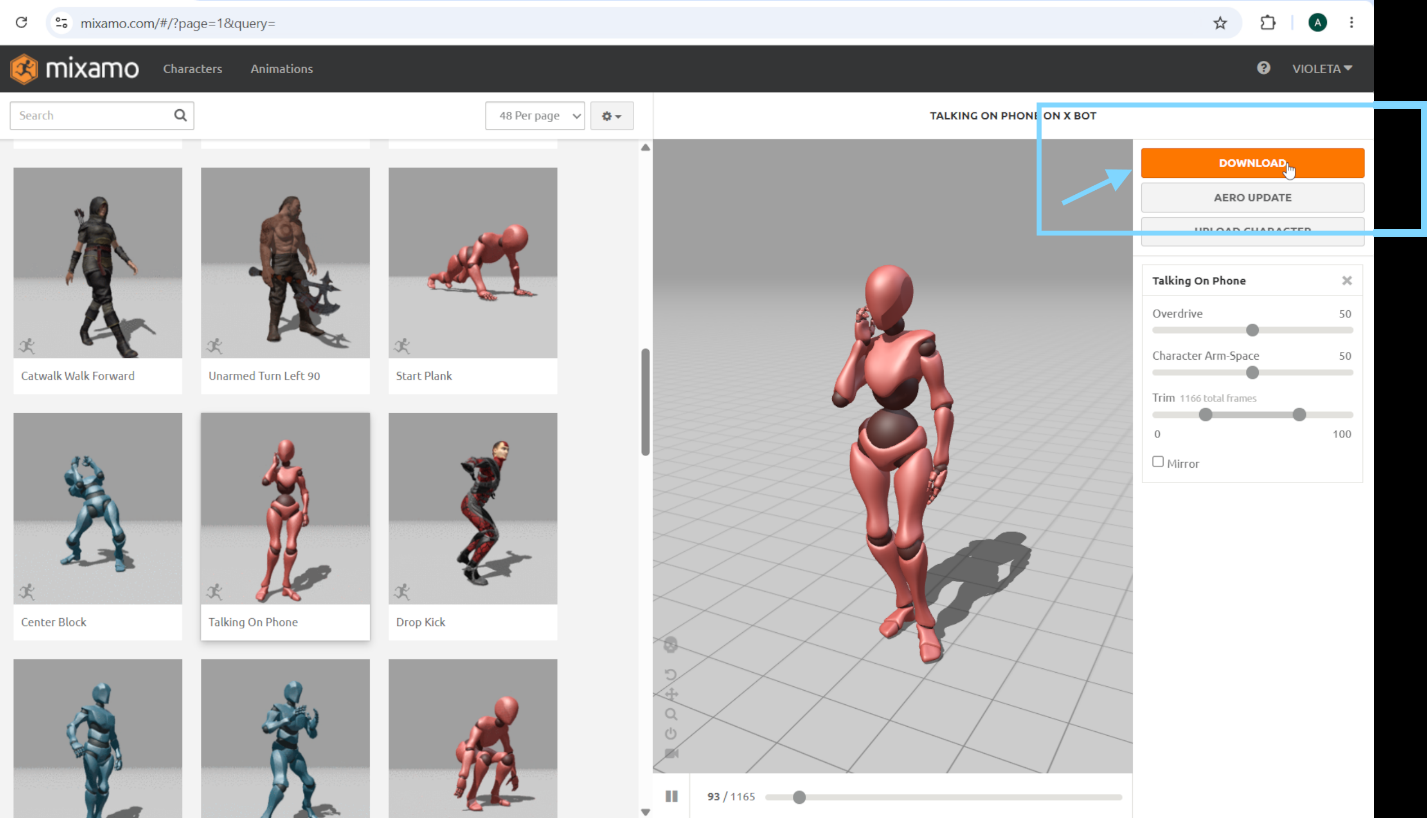
Custom animations and Mixamo Support:
Custom Animation lets you play an animation clip that is separate from the Snippet’s built-in playback. It is useful when you want an actor to perform an extra motion, such as a gesture, reaction, or body action, either on its own or together with a Snippet (f.e. Keep the facial animation and voice of a snippet but use a custom animation). We made it especially easy to integrate Mixamo animations. 1. Download the animation from Mixamo.com
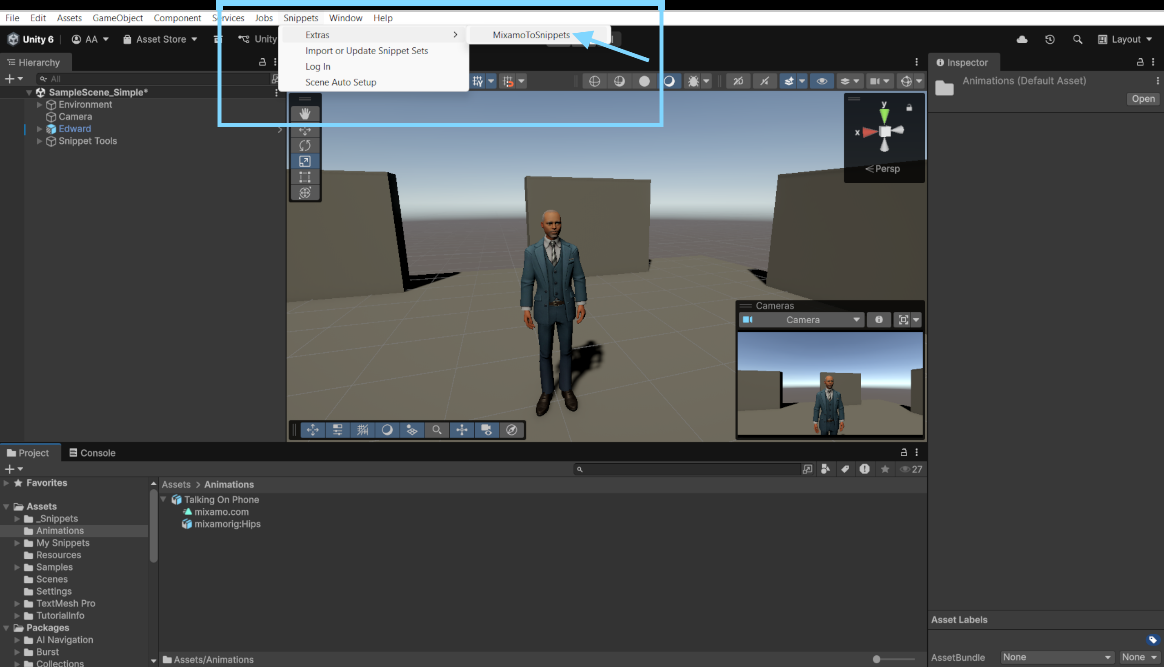
- Import the downloaded animation into your Unity project.
- In Unity, go to Snippets > Extra > MixamoToSnippets. This will make the animation compatible with the default stylized characters from the Snippets platform.
- Drag the imported Mixamo animation clip into the tool’s object field.
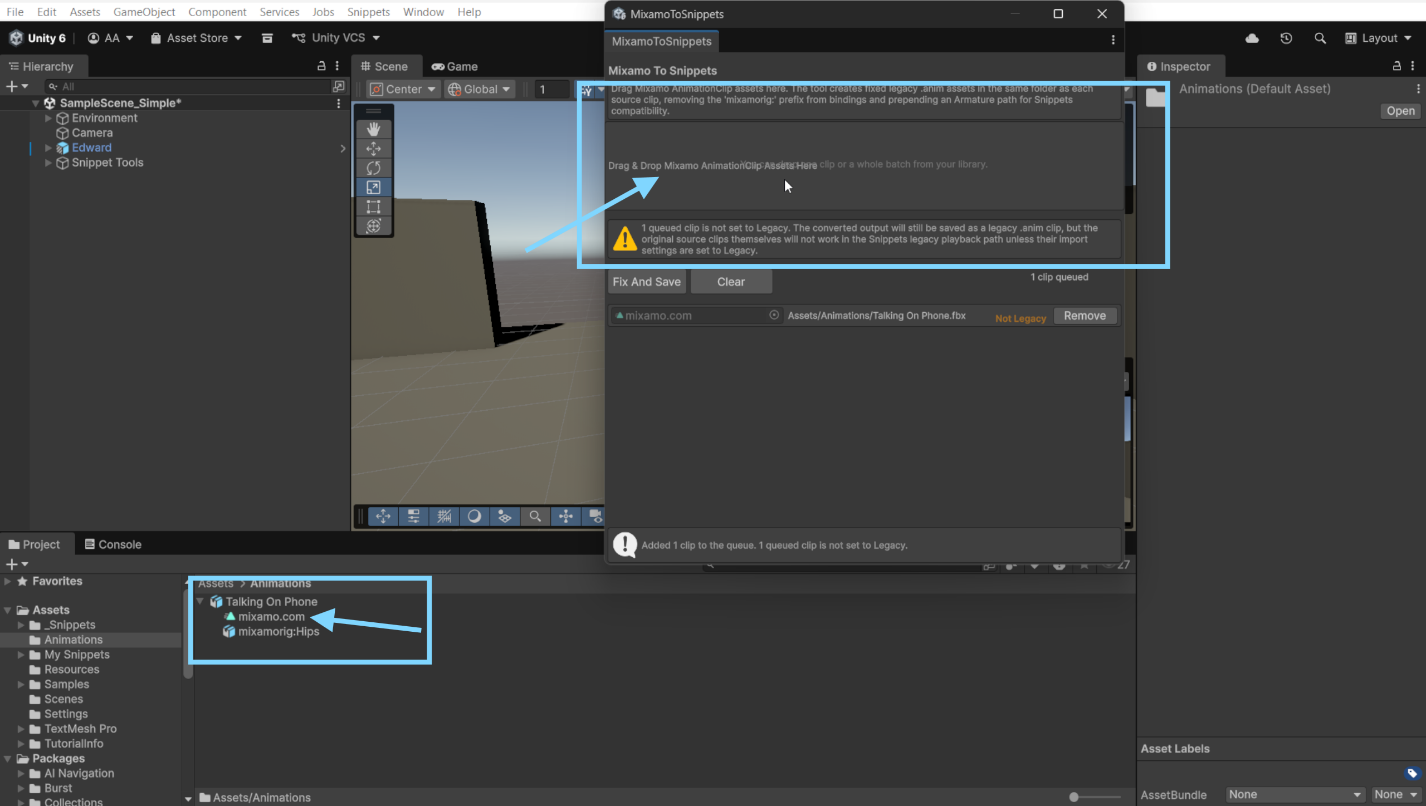
- Run the conversion.
- Select the object that contains the SnippetsActorRegistry component.
- In the Inspector, expand Show Custom Animations.
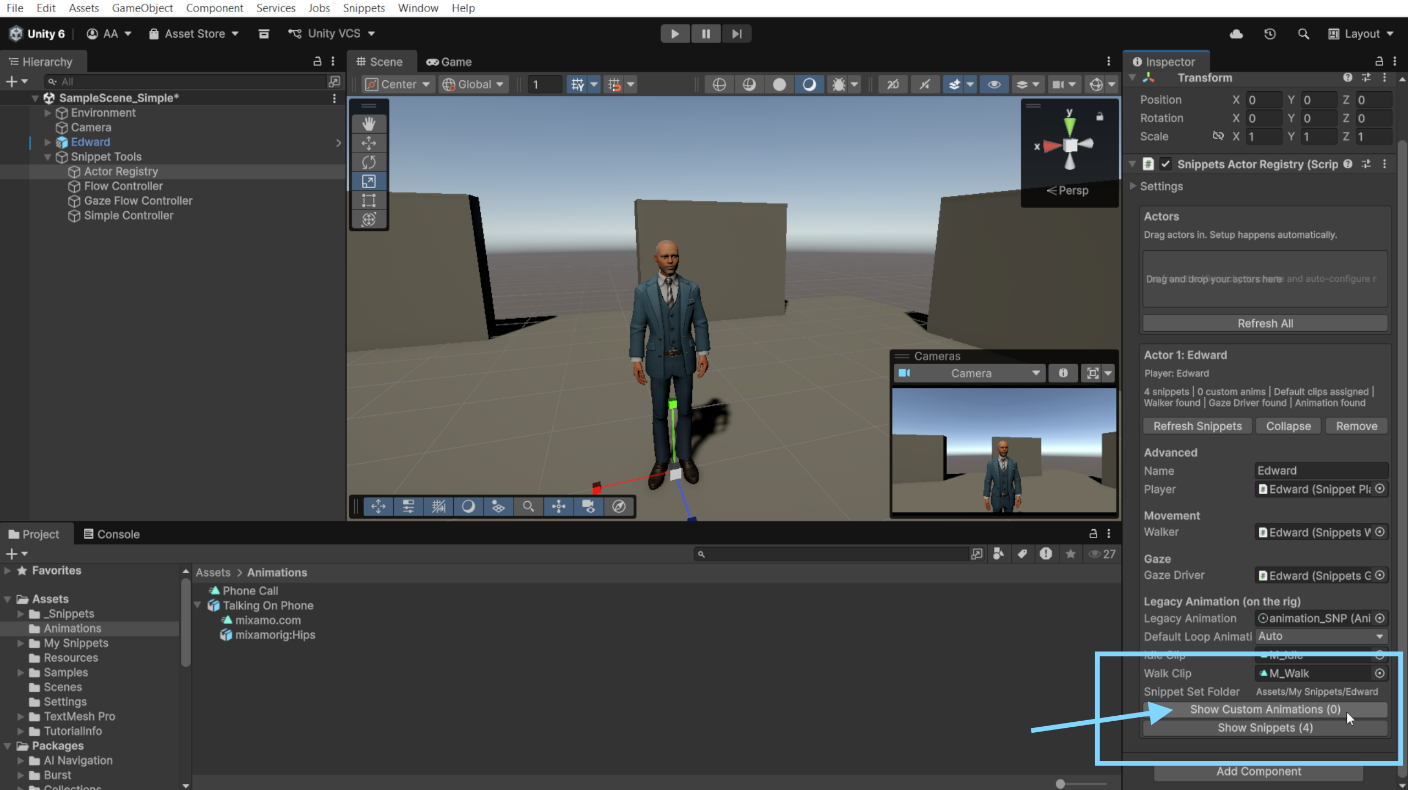
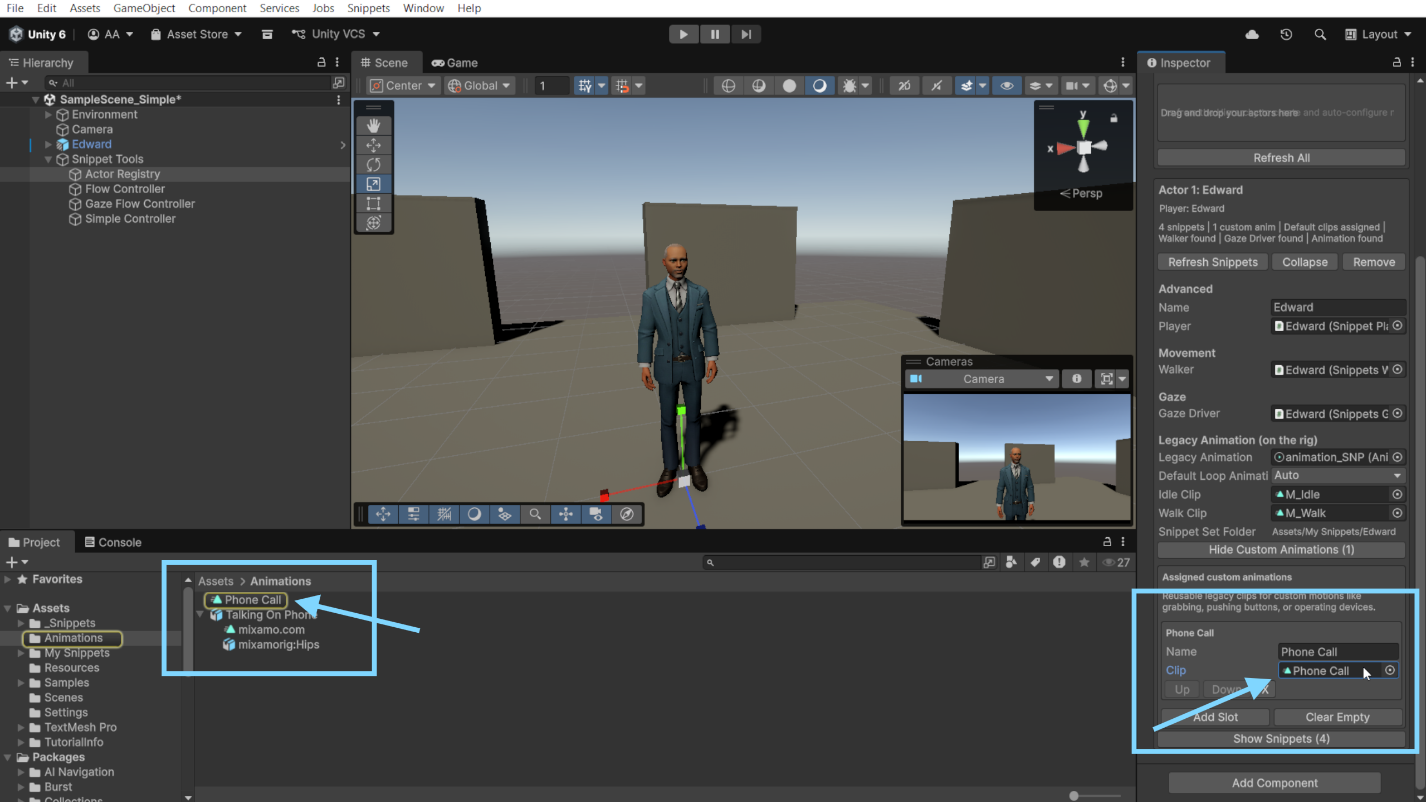
- Add a new slot.
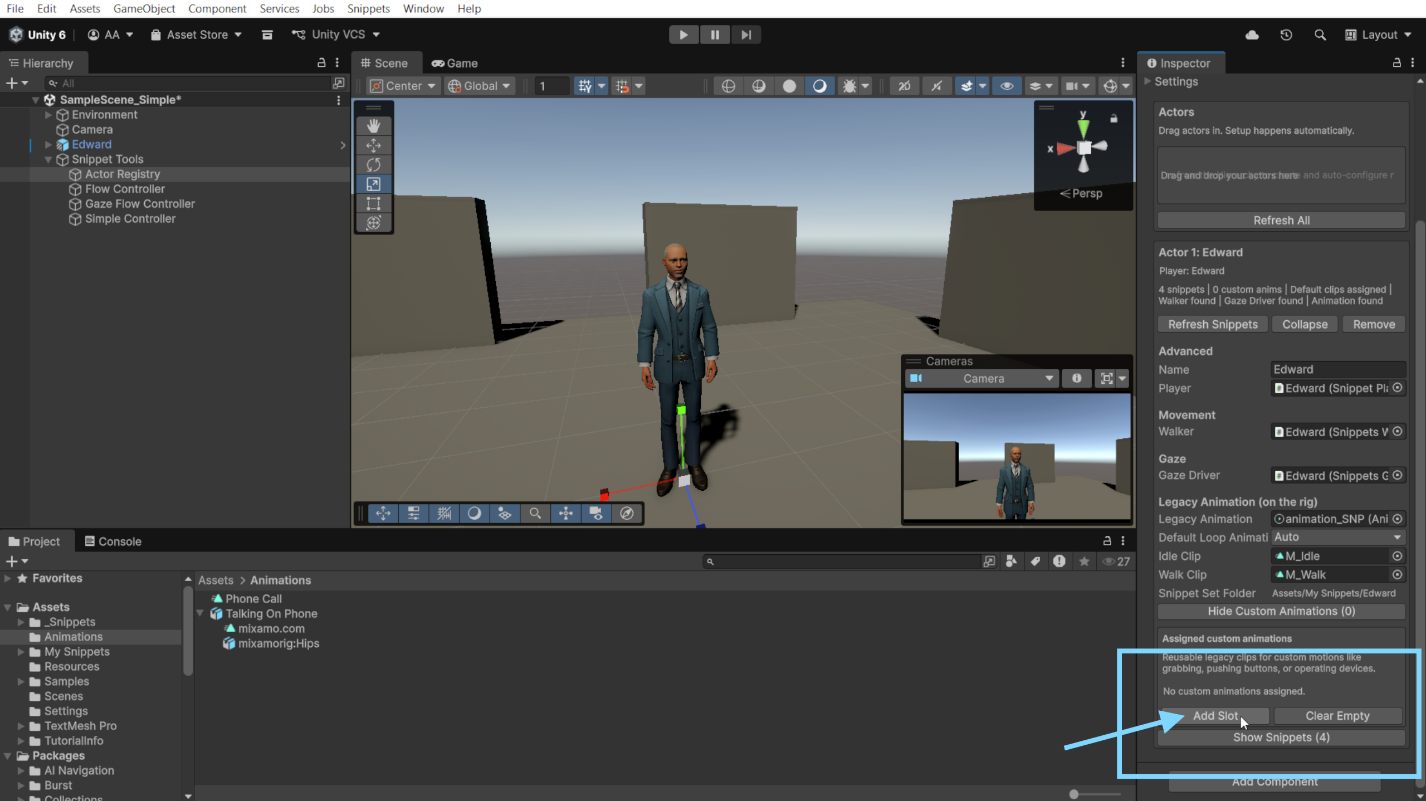
- Drag your animation clip into the new object field.
- Select the object that contains the SnippetsFlowController.
- Add a new step to the flow.
- Set the step type to either Custom Animation or Snippet + Custom Animation.
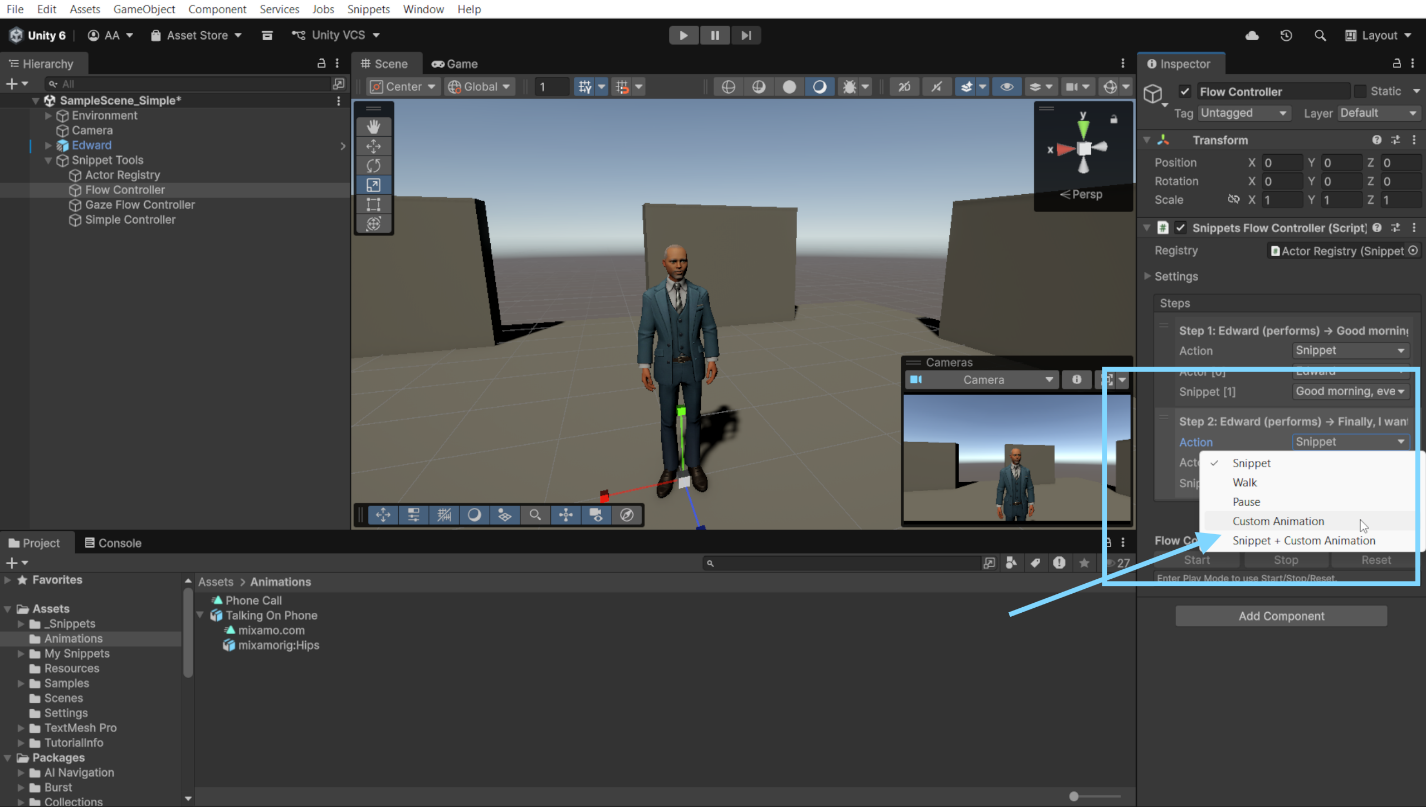
- Use Custom Animation when you want to play only the animation.
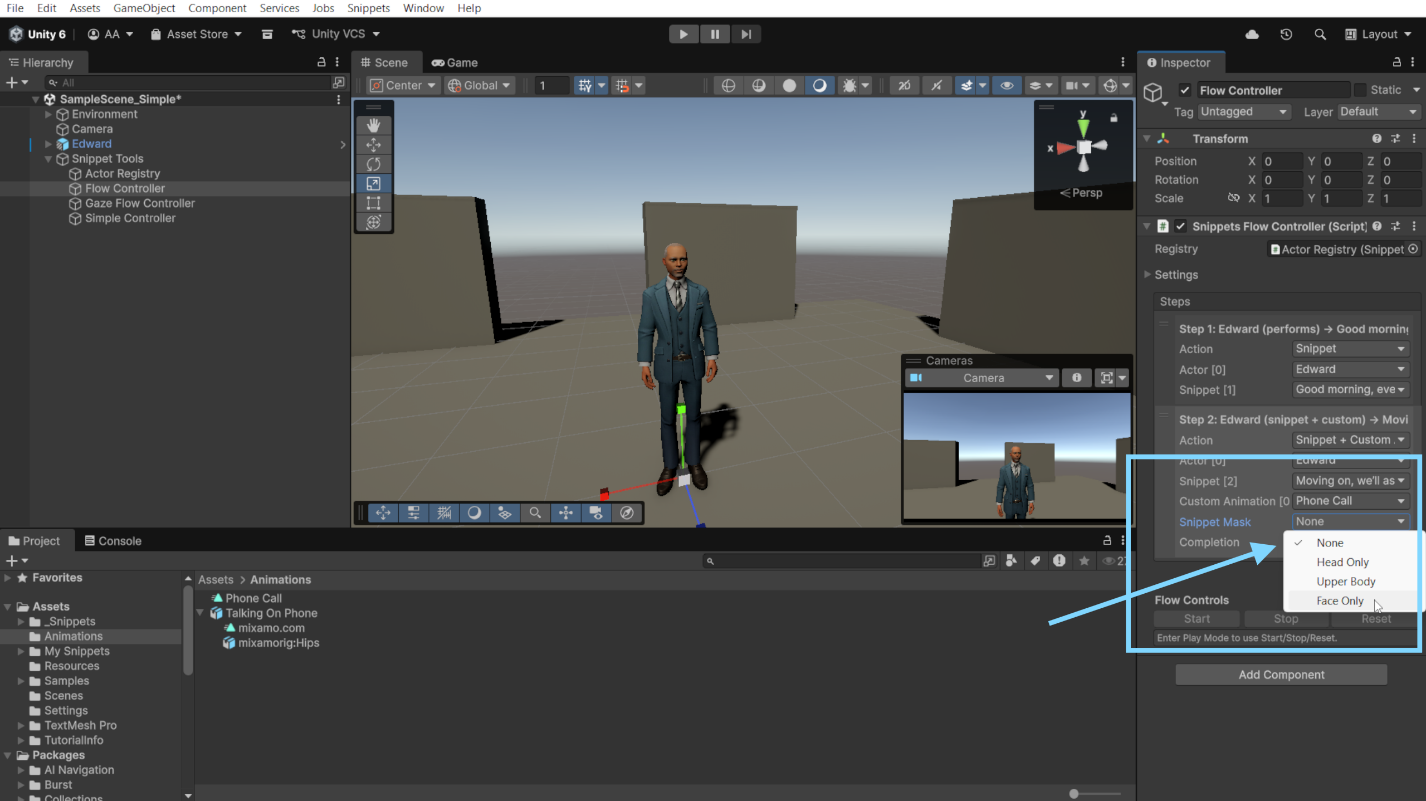
- Use Snippet + Custom Animation when you want the Snippet playback and the custom animation to run together.
- If you use Snippet + Custom Animation: also choose a Snippet Mask. The mask controls which parts of the Snippet animation remain active and which parts are overridden by the custom animation. (ex: if you choose face only mask, the face remains snippet controlled).
Testing strategy:
- Start with 2–3 steps only.
- Verify each step transition in Play Mode.
- Expand after baseline flow is working.
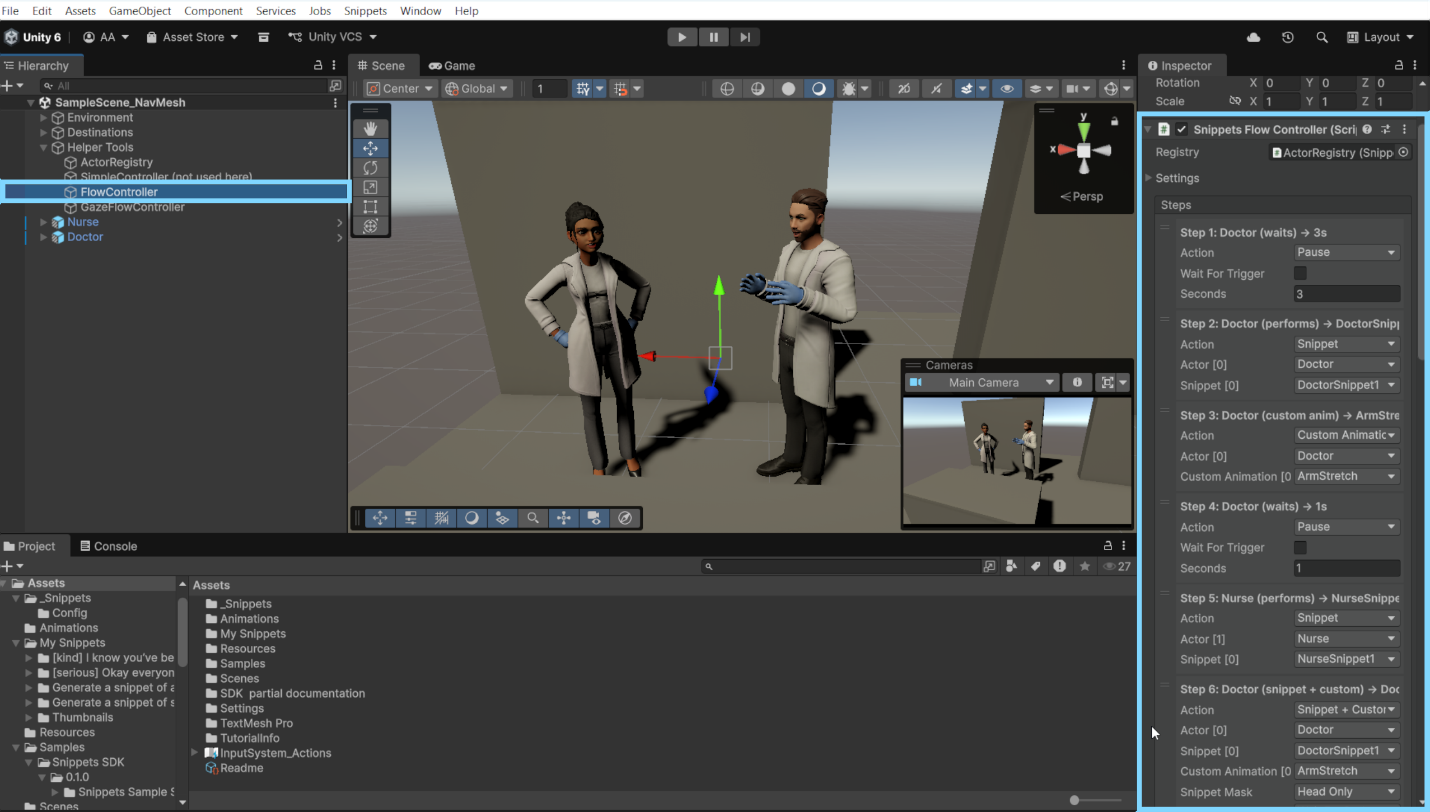
Snippets Flow Controller example implementation
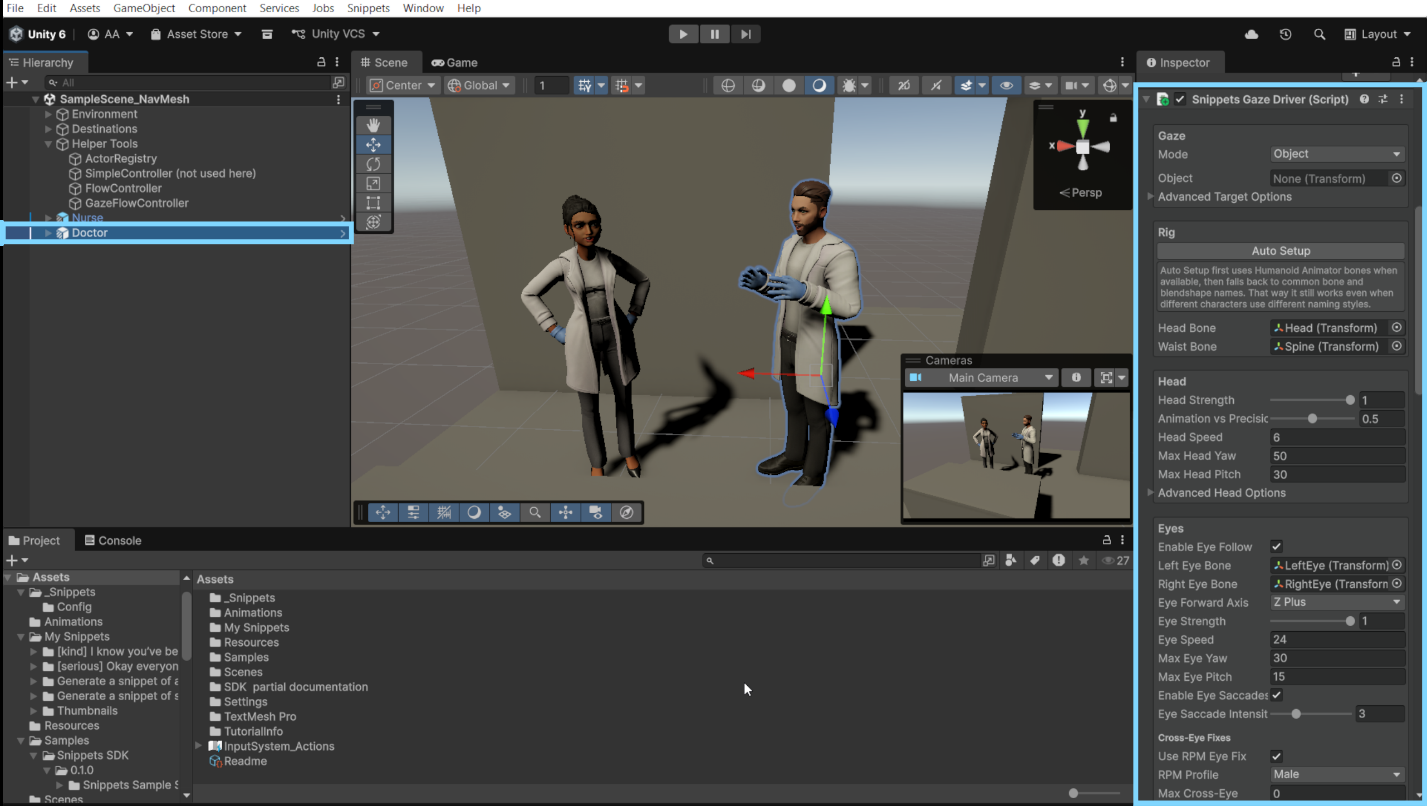
8.7 Add gaze behavior (SnippetsGazeDriver) (optional, but recommended for conversations)
SnippetsGazeDriver adds procedural gaze behavior to an actor. It is useful when you want a character to turn their head, eyes, and upper body toward a target, instead of relying only on the animation already included in the Snippet.
For natural attention and gaze direction:
- Add SnippetsGazeDriver to each actor that should use procedural gaze.
- Use the Auto Setup button in the Gaze Driver inspector first, then review the detected references manually.
- Assign or correct the required rig references: a. headBone b. waistBone f.e. “spline” (recommended for better body follow) c. leftEyeBone / rightEyeBone (optional, but recommended for dynamic eye follow) d. faceMesh / eyelid blendshapes (optional, if using eyelid follow)
- Configure a basic starting setup: a. Mode: FollowTarget or LookInFront b. Look limits and smoothing c. Waist follow values
- Assign gazeDriver in the actor entry of SnippetsActorRegistry (or rely on auto-find if appropriate).
8.8 Synchronize gaze with flow using SnippetsGazeFlowController
Once your flow is stable, add gaze choreography. 1. Add SnippetsGazeFlowController to the runtime/controller object. 2. Assign: - flow (SnippetsFlowController) - registry (SnippetsActorRegistry) 3. Click Sync Now so gaze steps mirror flow steps. 4. Choose UnspecifiedActorBehavior (recommended starting point: KeepPrevious). 5. Configure gaze per step: - Simple mode for step-level gaze changes (one gaze change / step) - Granular mode for cue-based changes during a snippet (percent-based) - f.e. “when snippet 1 reaches 20% of play time this gaze change occurs”
Recommended first setup:
- Start with Simple mode only.
- Add Granular cues only after the base flow works reliably. Screenshot to add: 28-gaze-flow-controller-sync.png Capture: SnippetsGazeFlowController with flow, registry, and Sync controls.
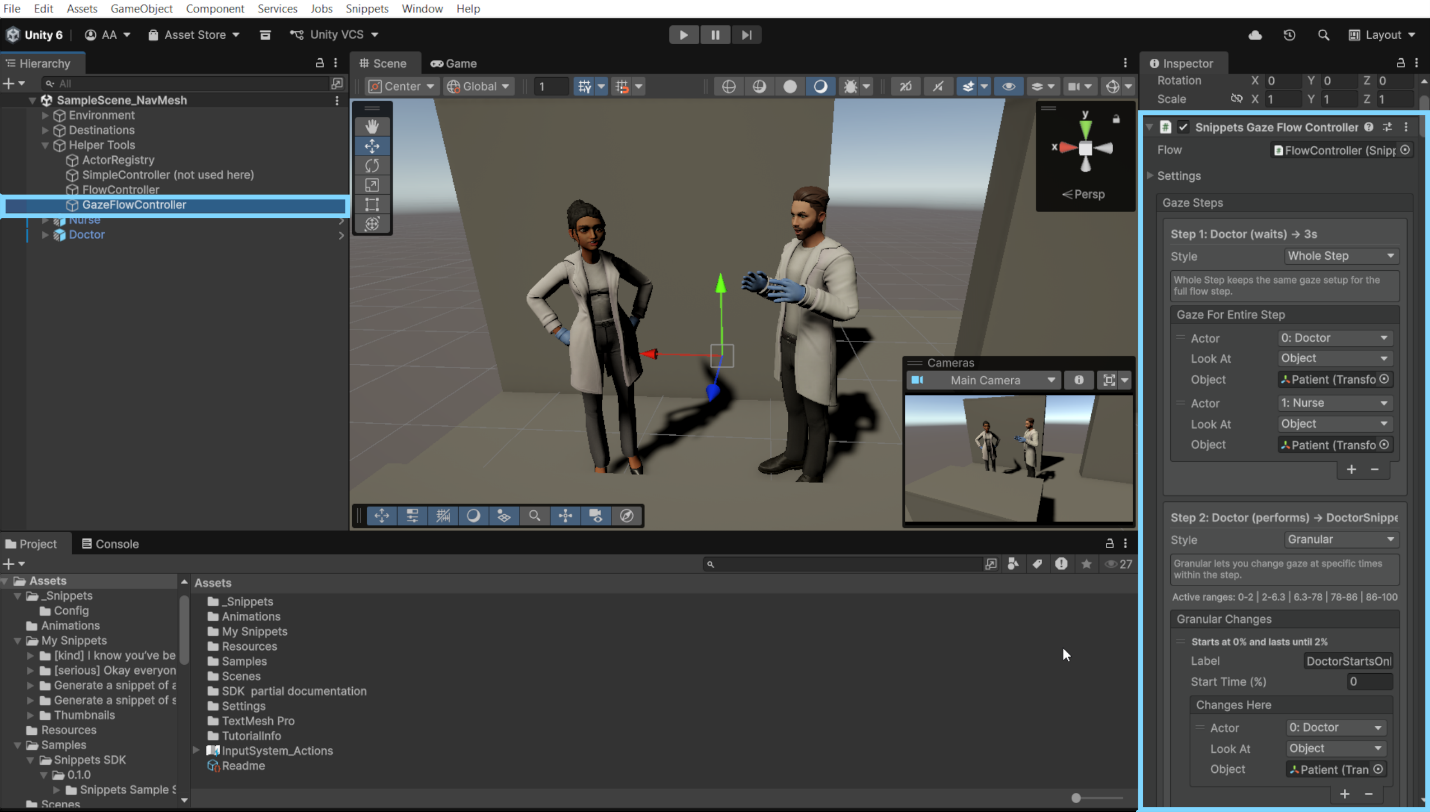
GazeFlow implementation example
8.9 Final controller-based validation checklist
Before considering the scene ready:
- Actors return to idle correctly after snippet/walk actions.
- Snippet audio/text remain synchronized.
- Flow progresses as intended (auto or manual).
- Gaze behavior matches expected targets.
- Controller-driven actors should not rely on standalone Play On Enable at the same time.
- No recurring Console warnings/errors during repeated runs. TIP: Review and experiment with the Demo Scenes provided with the SDK. All helper tools are implemented and present flows which utilize all features described.
← Previous: Bringing Imported Snippets Into A Scene
Next: Template And Playback Modes →